Skip to content

Earlier this year one of our inspectors was on site with a client to discuss a fairly simple project, but the visit identified a problem with the plan to shingle the roof. The roof, a simple single-plane sloping structure (“barn dormer” in building lingo) had a slope of about two feet over eight feet, (a 3:12 pitch) and the builder wanted to use shingles.

Veteran contractors may already know the problem our inspector identified: the roof wasn’t steep enough for a simple shingle installation.

The National Building Code of Canada stipulates that shingles can be used without much in the way of specialized installation for any roof with a slope of 1 in 3 (a 4:12 pitch for builders). Shingles can be used on roofs as shallow as 1 in 6 (a 2:12 pitch), but with special requirements, most notably that the installation must be such that there are three layers of shingle over the entire roof, not two as well as special applications of cement and tar.

Ultimately, the builder chose a metal roof, which is Code-compliant for a 1:4 slope, and for the builder, a simpler and cheaper alternative.

Here’s the thing with shingles: the shallower the slope, the more susceptible they are to issues of wind-borne rain driving up-slope.

Of course, shingle roofs require what we call “eaves protection,” (see post here: https://snbsc-planning.com/roofing-tip-protect-those-eaves/) and what builder refer to an “ice and water shield” when they transition over a heated space to an unheated eave. This helps protect the roof from ice-dams.

For suggestions on how to tame ice-damming, see the post on drop-chord trusses here. (https://snbsc-planning.com/benefits-of-the-heel-drop-chord-truss/)
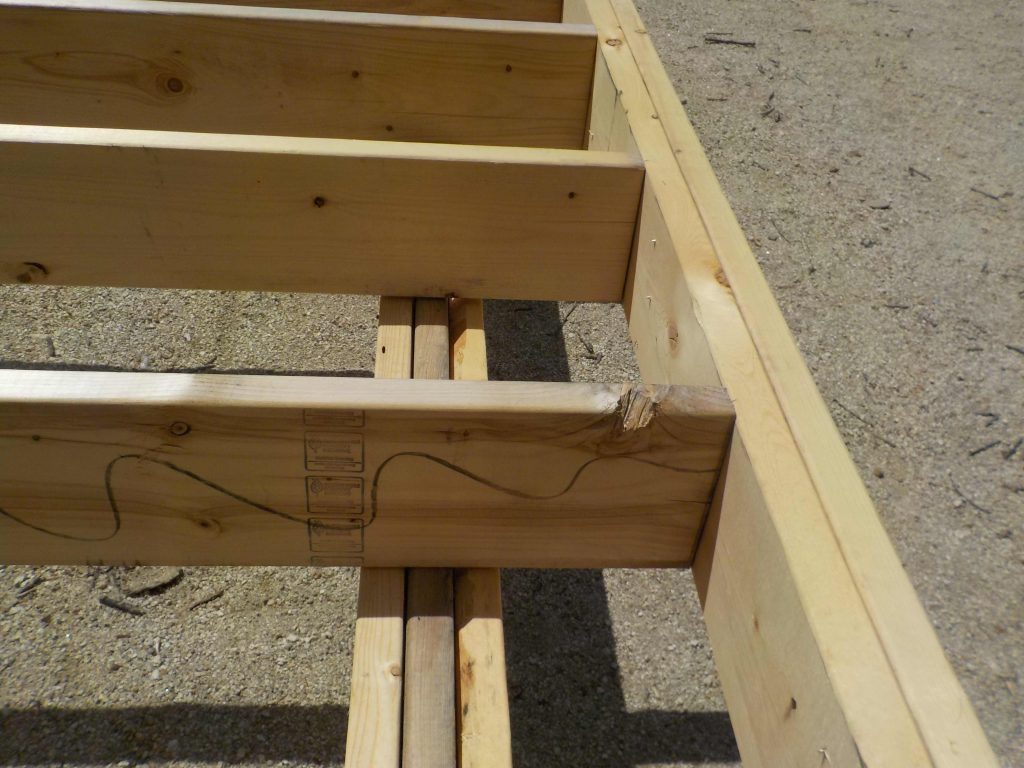
Every now and then, we field a question from a builder that requires a little more digging before we can give an answer. Earlier this year, one of our inspectors fielded such a question about a common practice: building a cantilever on a deck, such as in the image shown here.

This partly-built deck has a cantilever: the edge of the deck goes beyond the final support. It looks OK, but is it?

The question itself was simple enough: “how far can I extend that cantilever?”

For those that aren’t in the building business, a cantilever is simply a building element that extends beyond its support, and when you think about it, cantilevers are common to just about every building: most roof systems extend beyond the support of a house wall, for example.

For a number of reasons, folks building decks want to extend the deck beyond the support beam. One of those reasons is that making a small extension does much to hide the same beam. But how far can a builder go?

Here’s the interesting thing: the National Building Code of Canada is surprisingly silent on cantilevers when it comes to decks. There is some guide for cantilevered construction supporting roof loads (max 600 mm/24” cantilever when using 2x10s, max 400 mm/16” when using 2x8s), but nothing about cantilevers when there aren’t roof loads.

So our inspector dug deeper and found documents from the Canadian Wood Council. This organization’s work actually feeds into the National Building Code span tables.

The answer?

The exact same.

A Wood Council document (here) gives some very high-end detail about decks, but the take-away as far as cantilevers go is almost exactly the same: 400mm/16” for 2x6 or 2x8 lumber, and 600mm/24” for 2x10 or 2x12 lumber.

This question highlights how our office works: a question might stump us at the outset, but we’ll do our utmost to give a solid answer at the end. We serve the unincorporated areas of Charlotte and southern York counties, as well as the municipalities of Harvey, McAdam, St. George and Saint Andrews. Our inspectors can be reached by calling 466-7369.

The holes in this load-bearing stud are a violation of building code.

This image shows one of the things our building inspectors are trained to spot. This pipe is a vent pipe – known to some as a “stink pipe,” in a renovation.
And it also created a violation of the National Building Code in the process.
Why?
Buildings these days are complicated things, and now more than ever, sub-contractors are faced with challenges about how to route things like water pipes, waste pipes, electrical wiring, communications and alarm wiring and the like through joists and walls.
Here’s the general rule on how to drill holes through studs or joists: Never drill a hole more than 1/4 of the thickness of the load-bearing member, and never drill a hole so that its edge is closer to 50 mm of the edge of that section of wood.
Load-bearing studs have more strict regulations, according to clause 9.23.5.3 of our inspector’s favourite bedtime storybook, the National Building Code of Canada, 2010 edition:
Wall studs shall not be notched, drilled or otherwise damaged so that the undamaged portion of the stud is less than two-thirds the depth of the stud if the stud is loadbearing or 40 mm if the stud is non-loadbearing, unless the weakened studs are suitably reinforced.
That’s what happened here: the pipe cuts through a load-bearing stud and is larger than 1/3 of the stud width. The hole was actually 2 1’2” wide, in a 5 1/2” wide 2x6 stud.
Fortunately, our inspectors aren’t just trained to find problems: they’re also able to – at least in situations like this – provide solutions. Our staff asked the framing contractor to install a 2x4 on the inside edge of the damaged stud from floor to ceiling to create a supplemental load-bearing element: but it could have been worse.
The big no-no: do not damage engineered trusses or open-web joists. If this is done, we will require the builder to obtain detailed repair instructions from the truss/joist manufacturer, which can cause delays in construction.

Here’s the entire “notching and framing” section of NBC 2010, for those inclined to study such things.

9.23.5.1. Holes Drilled in Framing Members

1) Holes drilled in roof, floor or ceiling framing members shall be not larger than
one-quarter the depth of the member and shall be located not less than 50 mm from the edges, unless the depth of the member is increased by the size of the hole.

9.23.5.2. Notching of Framing Members

1) Floor, roof and ceiling framing members are permitted to be notched provided
the notch is located on the top of the member within half the joist depth from the edge of bearing and is not deeper than one-third the joist depth, unless the depth of the
member is increased by the size of the notch.

9.23.5.3. Wall Studs

1) Wall studs shall not be notched, drilled or otherwise damaged so that the
undamaged portion of the stud is less than two-thirds the depth of the stud if the
stud is loadbearing or 40 mm if the stud is non-loadbearing, unless the weakened studs are suitably reinforced.

9.23.5.4. Top Plates

1) Top plates in walls shall not be notched, drilled or otherwise weakened to
reduce the undamaged width to less than 50 mm unless the weakened plates are suitably reinforced.

9.23.5.5. Roof Trusses

1) Roof truss members shall not be notched, drilled or otherwise weakened unless
such notching or drilling is allowed for in the design of the truss.

We know – judging from the number of new permit applications received over the last few weeks – that there are a lot folks in the process of trying to build a garage or shed before the winter hits.

While some of these projects are contractor-built, a few are self-built.
For those that are tackling a wood-frame construction job for the first time, what seems daunting may be simple. And yet, what seems simple might be daunting.

Today’s post focuses on some wall-building tips that may help a first-time or inexperienced builder working on a small DIY project.

The key approach when framing walls, is to – if at all possible - build the walls on the floor of the building first, then lift them into place when done.

1) Select lumber. Use the straightest pieces for the bottom and top plates.

2) Mark off the points where the studs will lay in place. Most tape measures have red marks on the 16” increments, making 16-inch-on-centre framing easy. Remember, the width of a common stud is 1 1/2”.

3) Select the studs. If your structure is going to have interior sheathing, then it’s best to look down the line of the stud and place them so the crown (bend) faces up.

4) Once the framing is nailed into place, square the wall. This can be done by taking two tape measures on diagonals, and tweaking the frame until both tape measures read within a small margin of error – the top-line contractors will want less than 1/16” in difference across the two. This ensures the wall as it lays on the floor is square. If you really want to be touchy, brace the wall using tack nails before proceeding to the next step.

5) Install the exterior sheathing OR, at the very least, tack-nail a section of lumber across the diagonal. If you’re installing sheathing best practice is to leave a “lip” of OSB/plywood at the bottom equal to the height of the sill plate or supporting wood members.

6) If sheathing is installed, lay out the housewrap over the sheathing before raising the wall.

7) remove the tack nails, and lift the wall into place.

Installing the sheathing before the lift minimizes the labour required to install the sheathing after the wall is in place.

We’re still trying to bust the myth that permits aren’t required “in the country’, (they are). And there are several good reasons to get a permit, not the least of which is that applying for one puts our team of experts on your side, helping you avoid pitfalls that may otherwise stall your project and cost you money, pitfalls like:

Wetlands woes

Around lakes, streams, bogs and other wetlands, it’s pretty common for developments to require a Watercourse and Wetlands Alteration permit, affectionately called a “WAWA” by many.

What’s the outcome of building without a WAWA? The Department of Environment and Local Government may refuse to issue a WAWA after construction has begun – and it’s our policy that we won’t issue permits until necessary Wetlands permits have been obtained. The short and skinny: if you start building near a waterway or wetland without a permit, you may end up being unable to build what you’ve already started – and that means demolishing what’s already been done.

Property-line pains

In many areas, including rural (unincorporated) areas, there are provincial rules and regulations limiting how close something can be constructed to a neighbour’s property line – or the highway. If you build without a permit, you may find that something like a garage has been built too close to a neighbour, or too close to a roadway. The best-case scenario in such a situation is that you’ll have to apply for a variance ($250 that we might have been able to save you by just guiding the building location a few feet one way or the other). The worst-case scenario is that the building can’t be granted a variance, and has to be torn down: which is very likely to happen if a building is constructed across a property line. Again, working things through with our planning department can help avoid these disasters.

Land-use problems

There are a few areas within the region we cover – St. David, Pennfield, Lepreau and Bayside – that have what are called “rural plans.” These are simple land-use guidelines for rural areas that, while perhaps not as detailed or restrictive as municipal zoning regulations do put some limits on what land can be used for. These rules are designed to protect your property, your quality of life, the environment, and your community's economic resources. Given the above, it is always better to give us a call before launching into something that might not be legally permitted.

Code-compliance conundrums

Sometimes, a well-meaning action can result in unintended consequences. Some examples include:

  • Carbon monoxide detectors installed by doors to a garage, but not near bedrooms, as required.
  • Fire-rated drywall installed in residential garages, when not required, at needless extra cost
  • Ramps built to provide access for those with disabilities that don’t meet Code, and have to be altered after the fact

The takeaway: Call us first. We’re here to help homeowners and builders alike. We serve the unincorporated areas from Hanwell in York County to Lepreau in Charlotte County (and everywhere in between) as well as St. George, Saint Andrews, McAdam and Harvey Station.

It’s pretty darn obvious that the colder nights are coming. For most of us, that means nothing more than reluctantly starting up the wood stove, or setting a baseboard heater.

But for builders, cold weather means a bunch of considerations – or a stop to some kinds of construction entirely. Here’s a quick rundown on Code-enforceable temperature limits:

Concrete (9.3.1.9): When the air temperature is below 5°C, concrete shall be

  • a) kept at a temperature of not less than 10°C or more than 25°C while being mixed and placed, and
  • b) maintained at a temperature of not less than 10°C for 72 h after placing.

Mortar (9.20.14.1): Mortar and masonry shall be maintained at a temperature not below 5°C during installation and for not less than 48 h after installation.

Stucco: (9.28.6.1): 

  • 1) The base for stucco shall be maintained above freezing.
  • 2) Stucco shall be maintained at a temperature of not less than 10°C during application, and for not less than 48 h afterwards.

Drywall mud: (9.29.5.10): In cold weather, heat shall be provided to maintain a temperature not below 10°C for 48 h prior to taping and finishing and maintained for not less than 48 h thereafter.

Now, juuuuust in case you and your loved ones are arguing over what the correct indoor temperature should be, here’s what the National Building Code of Canada says: “At the outside winter design temperature, required heating facilities shall be capable of maintaining an indoor air temperature of not less than

  • a) 22°C in all living spaces,
  • b) 18°C in unfinished basements,
  • c) 18°C in common service rooms, ancillary spaces and exits in houses with a secondary suite, and
  • d) 15°C in heated crawl spaces.”

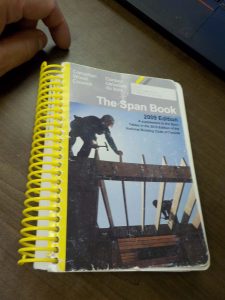
"The Span Book" is an indispensable tool for builders and contractors.

We don’t often promote anything in these posts, but today is an exception. Shown here is an image of one of our most-used books: and it’s not the bulky, insomnia-slaying Code book, either.

This is the “Span table” book from the Canadian Wood Council (link here: https://webstore.cwc.ca/product/canadian-span-book-2009-4/ )

For those of you who lirez le francais, a French version is also available.

This book provides pretty much every possible joist, rafter, beam and lintel configuration possible, and is an essential tool for those folks who are doing renovations, small additions, garages, sheds and the like.

And it’s Code-compliant: the tables in the Wood Council book actually drive the tables in the National Building Code, but are more detailed.

It’s what we use to verify joist loads, deck loads, rafter assemblies during our plans reviews and our on-site inspections.

Today's post from our building inspection department is short and sweet - but important.
When you receive your building or development permit (they're printed on yellow paper) please post the permit in a prominent location.
This lets everyone know that you've been a good, law-abiding, permit-obtaining citizen.
It also does help our inspectors find your site when they are out and about doing field work.
Oh, yeah, it's also the law: by regulation, neighbours can appeal a building permit during  a period from 10 days after it's been posted. 
Now, we know that the lovely yellow paper doesn't fare well against wind, rain and the other elements: that's why, starting October, we started mailing permits with a handy-dandy plastic sheet .  Or, alternately, photocopy it place it on the inside of a window visible from the street.
Thanks - and happy building!

Hopefully, by now, reading these pages knows our enforcement folks at the planning department are really working on making sure decks are built using Code-compliant 6x6 posts.
The message is getting out, because we’re seeing fewer decks built using 4x4 posts, and fewer attached decks built using deck blocks (which really, shouldn’t be used for most decks at all!)
However, another issue has emerged that needs a bit of attention: folks attaching what are intended to be load-bearing elements (beams) to the sides of posts.
Our message, in two words, “Please don’t.”
Beams for decks must be fully supported by resting atop load-bearing posts.

We could bore you with all the jargon in the Code book, but the basic take-away is this: beams must be supported by resting atop a load-bearing element.

This means that beams for decks have to be attached to the top of posts. (See image), and that anything else is not structurally sound by Code.
Sadly, there are some who will screw a crossmember intended to be a deck beam to the side of a post. This means that all the weight the beam or single joist carries is transferred to the screws used to hold it in place.
A Code-compliant 6x6 post can handle more than 10,000 pounds of weight while on a good day a screw can only handle a hundred pounds or so: there’s no comparison, when you think about it.
This is why we urge anyone thinking about a deck – either as a before-winter project or a dream for next spring – to call us first. As part of the permit application process, our inspectors will evaluate your plans and help you do it right.
We serve all the unincorporated areas of Charlotte and southern York counties, as well as Harvey, McAdam, Saint Andrews and St. George.

For the most part, those of us living in New Brunswick escaped the wrath of Hurricane Dorian – but as images and video from Nova Scotia show, the power of a hurricane is immense.

And New Brunswick will be hit: it’s not a matter of “if,” but a matter of “when” a hurricane will hit us. The lesson? Prepare now.

Hurricanes cause damage in two key ways: high winds and flooding/storm surges.
Here’s what our inspectors suggest as things to do in forthcoming renovations or new builds to better weather a hurricane.

1) Use hurricane ties to secure rafters/trusses to roof plates. This is easy to do in a new build, not so easy to do in a renovation setting.

A hurricane clip used in this outdoor deck roof. Exposed roofs (carports, verandas) are susceptible to wind uplift, so going with hurricane ties is a wise way to help mitigate the threat of wind damage.

2) Specify heel or drop-chord trusses in new builds. This allows for exterior sheathing to help tie rafters to the rest of the building

3) Over-use eaves protection membrane. In many cases, the combination of high winds and intense rainfall causes water to be wind-driven in places it normally doesn’t go. Alternately, roofs are exposed to rain after the winds remove shingles. Flashing roof joints with ice and water shield membrane, even when not called for by Code, can help reduce water damage.

4) Avoid gable roofs. Though popular, gable roofs present a face to wind that other roofing systems (hip style, in particular) do not.

5) Plan for strong wind and rain by pre-building a blocking system for roofs vented using an end-gable vent.

6) When using soffit-and-peak venting, only provide as much soffit venting as required by Code, to reduce wind intrusion into attics

7) Over-nail roof sheathing to truss/rafter members. Codes for U.S. areas subjected to high wind mandate nailing every six inches on all truss members, not just at sheathing joints.

8) Avoid staples for fastening asphalt shingles. Areas of the U.S. exposed to hurricanes mandate roofing nails, because they perform better in high-wind situations.

9) Build so that valuable portions of a home will be above flood levels.

10) For homes in areas subject to flooding, raise them using concrete walls that have “vents” at the sides to allow for easy infiltration and outflow of flood waters.

An illustration on best practice for building in anticipation of flooding. The lower portion, shown here, is built with concrete or concrete block, extending to 1 metre above expected worse-case flood level.

11) Install a backflow prevention valve.

A backflow prevention valve: for less than $100, this simple device can help reduce flood damage from backed-up sewers

12) Place outbuildings on concrete slabs or other footings.

These tips are taken from our “preparing for climate change” pamphlet, or a more comprehensive “preparing for climate change – a guide for builders” available for free at our offices.