
Yes, we've said it before - but we need to say it again: get a permit.
In the last three business days, our office has located a total of seven building projects started without required permits.
We'll say it again: permits are required for almost all construction, everywhere. This includes the rural areas. Yes, you need a permit outside of a municipality to build. In many cases, it's a simple $50 development permit. Any addition to a house requires a building permit, and cannot begin without one. A permit prevents a host of problems, like building in a wetland when you shouldn't, or building too close (or across) a property line. We've had all of these take place in recent history, and it's a needless, avoidable hassle (and expense.)
Simply put: call us first.
Our building/planning staff is working from home. Our general line is answered during most business hours. Email. Call.
Get a permit before you build.
Author: Vern Faulkner
A word on fire stops
Today, our note of the week is going to focus on an aspect of commercial construction that can, at times, be rather challenging: fire stops.
What is a fire stop?
In many commercial buildings, walls or ceilings/floors are required to have a fire-resistance rating. In simple terms, this means that these walls/ceilings must be able to withstand direct contact with fire for a specified period of time. The intent is that if a fire does start in a building, there is enough time for the occupants of the structure to escape.
In order to achieve the required fire resistance rating, a wall or ceiling/floor has to be built - or assembled - in a specific way. In fact, building Code parlance for a wall or floor of this nature is "assembly." There are hundreds of different, rigorously tested combinations of materials, each of which can be assigned a specific fire-resistance rating. In our area, most buildings that require fire-rated assemblies feature 45-minute or 1-hour fire resistance ratings.
The thing is, it's almost impossible to build without punching holes through floors or walls. It's how plumbing and electrical services are provided to the rooms in a building. These holes essentially create weak spots in a fire-rated assembly.
A fire stop is a designated system of materials designed to restore the fire-resistance rating of an assembly. This means a fire stop is not one item - it's a series of items added together. For example, the fire stop assembly for a single cable penetrating a 45-minute fire-rated wall will include the Type X gypsum on both sides, the wood studs framing the wall, the cable (including what the cable is made of and its diameter) and the material used to seal that cable, such as a fire-stop caulk or a putty pad.
It’s also important to note that different products have different intended uses. There is no one do-it-all fire stop product.
Have ten minutes? This video will help explain fire stops.
This cannot be stressed enough: a fire stop is NOT simply the process of taking a material purchased at a hardware store and squirting it around a penetration in a fire-rated assembly.
a fire stop is NOT simply the process of taking a material purchased at a hardware store and squirting it around a penetration in a fire-rated assembly.
Example: We have had a number of challenges with contractors using a readily available product supplied in many hardware stores to seal openings around plastic pipes or electrical outlet boxes. Unfortunately, the product is intended to seal seal gaps between gypsum (drywall) walls and the underside of concrete floor systems. It was not intended to seal around pipes or electrical outlets. Naturally, our inspectors asked for the improper product to be removed and a correct fire-stop system to be installed at the contractors' expense.
What makes a system
A fire stop system is comprised of:
- The wall or floor where the opening occurs, and how that wall/floor is built
- The size of the opening
- the material or materials going through the wall or floor
- The materials being used to restore the fire separation's integrity.
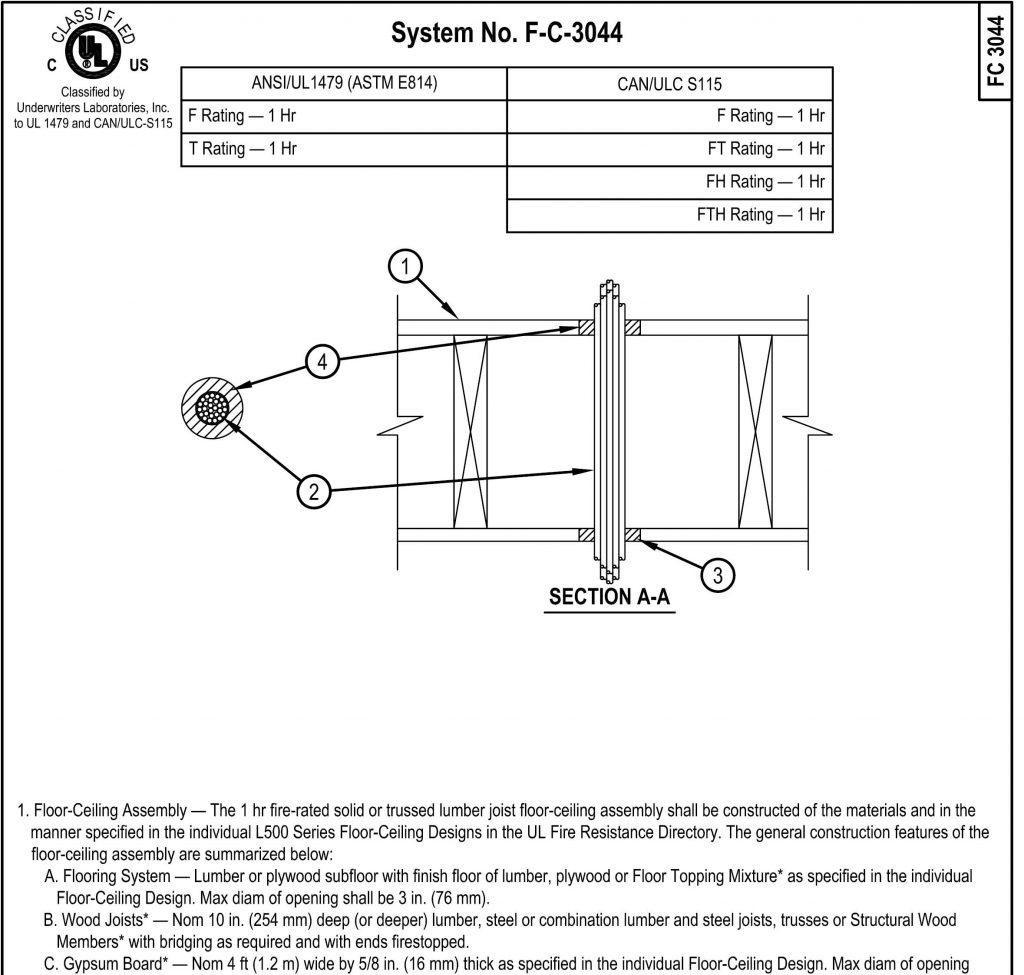
In other words, inspectors can only approve a specific system - a specified combination of all of the above - once it has been compared to a list of tested systems to see if it meets the requirements of the required fire-resistance rating.
How to specify a system
In some of our permits, we will insert language in either a plans review or as part of the permit stating, "fire stop assemblies must be approved before use," or something to the same effect.
This is our office's attempt to make sure a fire stop is done right, the first time.
There are several websites that will assist a contractor in navigating the complex world of specifying a system.
Hilti's fire-stop submittal portal
3M's fire stop submittal portal
Metacaulk's fire stop submittal portal

Not surprisingly, each of these portals promotes the use of brand-specific products in ULC-approved systems. However, they are all relatively easy to use and in a short period of time, a contractor can determine what products they need to use and how to use them (a system). We will wish to know what system is being used (print it off, send it as a .pdf) in order to approve it.
Each of these portals will guide the user through a selection process that will produce a diagram and instructions to create a suitable fire stop system for a specific need.
Want to learn more?
Hilti's regular online courses. They are free, although you have to sign up and create a profile with Hilti to participate.
STI's "Firestop university" There is a one-hour course, consisting of six videos that are quite comprehensive. Each of these portals will guide the user through a selection process that will produce a diagram and instructions to create a suitable fire stop system for a specific need.
Updated wheelchair pamphlet available
As the province grows older and we all grow a bit more aware of the needs of others, its understandable that homeowners and business operators would want to make access easier through a wheelchair ramp.
When it comes to building ramps, though, there's a lot that can go wrong. For example, it's not uncommon for a ramp to be constructed that is simply too hard to use for those it was intended to help! That's why we've built a pamphlet aimed at helping weave through the Building Code and help make your project right.
Our one-page pamphlet is available for free at our office (or for download here if you want to print it off at home.)
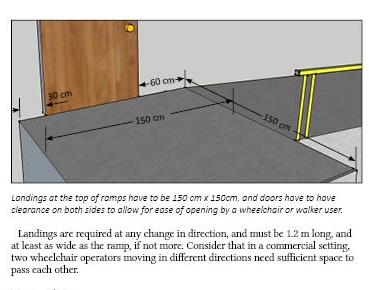
New Brunswick's building codes for things like wheelchair ramps and bathrooms are among the best in the country when it comes to helping out those who are confined to wheelchairs, need to use walkers, or are visually challenged. But that means builders have to be quite attentive when constructing commercial wheelchair ramps. (Note: these require building permits, in part to make sure submitted plans meet Code requirements.)
It's our intent to write a companion guide on wheelchair-accessible bathrooms in the weeks to come.
Questions? Give our building inspectors a call. We can be reached at 466-7369, ext. 3.
Inspections to continue during Covid-19
Just a quick word to our clients in the construction industry. We know that you're still out there, pouring concrete and swinging hammers, even if we're working from home.
Provincial regulations require inspections at set points in a build, and our inspectors will be available to conduct those mandatory inspections, even if we're not in the office.
We ask, however, that you do give us a bit more notice of a required inspection (which is indicated on your building permit.) This is because our inspectors will hve to travel from home to obtain a company vehicle - so a day's advance warning at the very least is politely requested.
To arrange an inspection, please email one of our inspectors directly. If calling by phone, please allow a little more time for the forwarding magic to work.
Michael Hall | michael.hall@snbscs.ca | 466-7369 ext 2
Vern Faulkner | vern.faulkner@snbsc.ca | 466-7369 ext 3
Construction sites aren't the most congested places, but we will be diligent in ensuring social distancing during our time on your site or (in the case of residential final inspections) your home.
To those who are still on-site, we respect the work you do, and thank you for doing it. Please stay safe.
A critical step with floors over unheated space
A few times in the last year, our inspectors have run into a critical oversight that’s caused problems: incorrect placement of vapour barrier in floors over an unheated space.
First off, there’s a general rule on where vapour barrier goes: the warm side of the building. For things like walls and ceilings, that’s a really obvious thing. However, when building a stud floor over, say, an unheated crawl space – which is usually insulated later in the build than other sections – it’s easy to overlook the vapour barrier placement.

The image provided here illustrates how it should be done: vapour barrier is drawn over the joists before the sheathing goes down.
What some folks might overlook is the vapour barrier when building a suite over a heated garage. Garages are considered unconditioned (unheated) spaces, and for good reason: they’re often exposed to serious drops in temperatures, even if insulated and heated like the rest of the house. Further, garages must have a layer of vapour barrier encapsulating them to keep vehicle fumes away from the rest of the house. In this case, the old rule – vapour barrier on the warm side – holds true.
There is one critical exception: if closed-cell foam is used as the insulation. In that case, the foam serves as the vapour barrier, and can be applied on the underside of a sheathed floor without vapour barrier being in place.
A word on drilling framing members
In the past few months, our inspectors have noticed a number of situations where over-large holes have been drilled in framing members, or, alternately, holes have been drilled too close to the edge of a framing member.
We remind contractors of the relevant code on drilling holes through load-bearing elements:
9.23.5.1. Holes Drilled in Framing Members
1) Holes drilled in roof, floor or ceiling framing members shall be not larger than one-quarter the depth of the member and shall be located not less than 50 mm from the edges, unless the depth of the member is increased by the size of the hole.

Our inspectors have also observed holes for plumbing – usually for draining toilets or showers - drilled through the top members of open-web joists in the floor system below. This requires the contractor to contact the joist manufacturer for an engineer-approved repair, at the contractor’s expense.
If you have questions, give us a call. Our building inspection department serves rural Charlotte County, southern York County, and the municipalities of St. George, Saint Andrews, Harvey and McAdam.
Pro tip for interior walls
This week, we’re going to give you a “pro tip” that will make installation of vapour barrier a whole lot easier.
If interior walls are going to be installed before the ceiling vapour barrier, staple a strip of vapour barrier on the ceiling where the wall is going to go before the wall is lifted into place. This gives a continuous barrier above the wood of the interior wall, and makes the later installation of vapour barrier a lot easier: it also means no worries about using acoustic sealant on that wall, because there is no need.
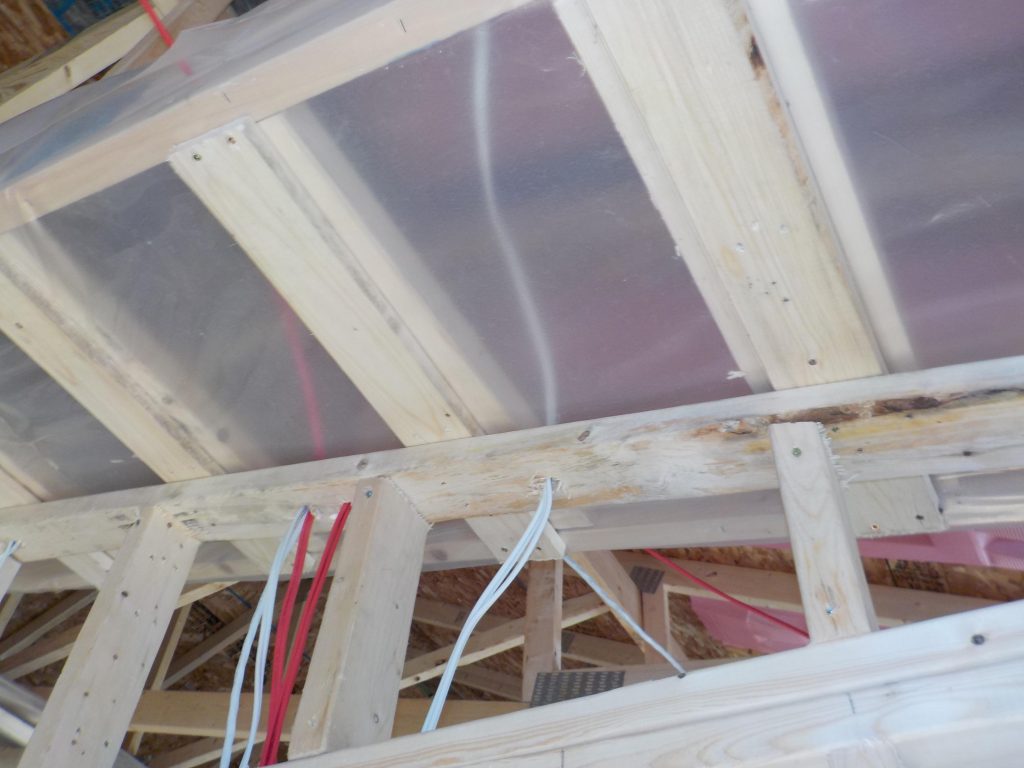
This simple trick ports over very nicely into more high-end construction where fire-rated drywall is required on the ceiling. In these cases, the drywall must be installed before the walls: failure to do so will result in some costly and time-consuming alterations after the fact.
A primer on shingles
We had a question yesterday about shingles – that is, applying shingles to the side of a structure.
In this area, due to the heavy rainfall, one of the requirements for shingles is that it has what we call a “capillary break.” That’s a fancy term to describe a 1-cm gap that must be left behind the shingle and the housewrap behind. This is so that when (not if) water penetrates the shingle, it has a place to drain. There are two common ways to achieve this. The first is to apply a shingle backer, which looks like a scrubbing pad on steroids. The other method is to tacknail pressure-treated garden lattice on the side of the building. This also provides the required offset and breathing/drainage space.
You may ask, “why did you use the term ‘when’ water penetrates” the shingle? Shingles, like all wood products, absorb water. Even if there is no rain, but humid conditions, the shingle will retain moisture. If this moisture has nowhere to go, it will lead to mold and mildew behind the shingle, and begin to force its way through the housewrap and cause serious problems with the sheathing (and worse.)
And here, for your reading pleasure, is the Code on what kind of shingles to use on walls.
9.27.7.1. Materials
1) Shingles and shakes shall conform to
a) CSA O118.1, “Western Red Cedar Shakes and Shingles,” or
b) CSA O118.2, “Eastern White Cedar Shingles.”
2) Western cedar shakes shall be not less than No. 1 or Handsplit grade, and western cedar shingles not less than No. 2 grade, except that No. 3 grade may be used for undercoursing.
3) Eastern white cedar shingles shall be at least B (clear) grade, except that C grade may be used for the lower course of double course applications.
Questions? We serve the rural areas of Charlotte and southern York Counties, as well as the municipalities of McAdam, Harvey, Saint Andrews and St. George. We can be reached at 466-7369.
The Permit 411 on minihomes, modular homes, mobile homes and other pre-fab structures
We’re starting to get the message out there that permits are needed for any new construction, even in “the country,” as some folks call the unincorporated areas. But our staff have noticed some confusion or mis-information about placing pre-built structures, including the (false) belief that no permit is required to move an existing structure onto a piece of property.
Here’s the key take-away: a permit is required to place any notable building on property.
(What do we mean by “notable?” In simple terms, it means nobody is going to be upset if you build Fido a doghouse.)
But the rules and permits required vary depending on what kind of pre-fabricated building one may intend to place.
Modular homes:
These structures are built to very strict engineering standards and then placed on a foundation on-site. A building permit is required for all modular homes, but we only evaluate the permit cost based on the on-site work (concrete and finishing costs.) Inspections are required for the foundation and before move-in.
Other structures (shipping containers, etc):
Long-term storage units, like shipping containers or transport trailers with wheels removed are considered “structures” as far as provincial and municipal regulations are concerned. These will require development permits in rural areas, and either development permits or building permits (depending on size) for municipalities – if allowed at all. Once more, call first.
Building inspector vs. home inspector explained
One of the challenges our building inspectors face is that some folks confuse our building inspectors with home inspectors. What's the difference?
A home inspector is usually involved at the onset of a real estate transaction. They are usually hired by a potential purchaser to evaluate the structural status and overall condition of an existing building.
A building inspector evaluates renovations, new construction and changes of use/occupancy. Their task is to ensure that the construction meets the National Building Code of Canada, including structural safety as well as life and fire safety. Building inspectors are usually employed by a government body of some nature, and have a certain scope of legal powers under the Community Planning Act, which also includes the power to work with municipal by-law officers in deeming buildings suitable for demolition.
In New Brunswick, a provincial professional association – the New Brunswick Building Officials Association - oversees education and certification of building inspectors, and the training meshes with a national body to ensure inspectors have similar training and qualifications across the country. All the inspectors employed by the Southwest New Brunswick Service Commission are active members in the NBBOA.