We know it’s warm outside, but just for a moment, we want you to think about winter – because what what you do with that summer roofing project now could save you a whole host of headaches once the snow starts flying.
This time of the year, it’s not uncommon for folks to reshingle a roof. It might not be the simplest of DIY jobs, but for someone with basic construction skills, it’s easy enough.
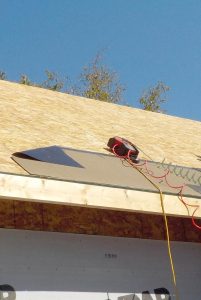
Here’s a tip to make sure it’s done right. In many cases, it’s a requirement of Code to install what’s called “eaves protection” along the lower edges of a roof. Builders will often call this by a brand name, of which there are a few. However, regardless of the manufacturer of the eaves protection, they are all essentially a strip of waterproof material that adheres directly to the sheathing, as shown in the image.
Here’s the why: It’s to protect water created by ice dams from leaking into your home.
Here’s the how: In most cases, the roofline of a typical gable roof pinches off at the attic. As a result, insulation is a little thinner where the roof comes over the wall, resulting in a bit more heat getting to the roof. This melts snow/ice, which then trickles downslope to the part of the roof that isn’t heated at all. Whammo, the water freezes, creating those massive globs of ice that gather at the edge of a roof. If they get large enough, these ice dams will result in water seeping up under shingles.
Eaves protection isn't required for all roofs: just shingle and shake roofs, of a certain slope (greater than 8:12 pitch.)
That said, best practice is to install eave protection on the edges of any shingle/shake roof that is subject to heating, as well as along the valleys.
Oh, and another thing: building permits are not required anywhere in our service area for re-shingling a roof.
Questions? Give us a call at 466-7369.