Of late, our office has been dealing with a number of situations where people have begun construction of some major work without a required building permit.
We cannot stress this enough: don't. We have dealt with several instances where builders/property owners have begun work without permits, which has resulted in extra costs after the fact to rectify the work.
One of the critical services our building inspectors provide is a plans review. This is where the proposed plans are evaluated for structural integrity, (are the footings sized for the loads? Are the lintels suitable? Are joists sized for the spans and loads?), environmental protection (is the insulation sufficient? Is there sufficient ventilation?) as well as fire and life safety. Proceeding to build without this "second set of eyes" on a plan is risky as well as illegal. And it can cost a lot of money.
Possible repercussions of starting work without a permit include:
Costs to have an engineer certify undersized footings are capable of handling structural and snow loads
Costs required to remove construction that encroaches a protected wetland or river corridor
Costs required to retroactively apply for variances (setback, lot size limits, land use)
Delays caused by contractors moving to other work during a period when a stop work order is in force
Costs required to replace work that didn't comply to Code
And, if the matter warrants, fines.
The bottom line - call us. Please don't build without a permit.
Over the last few months, our building inspectors have encountered serious challenges with clients deviating from approved plans without contacting us first.
Even minor changes can lead to problems down the road: changing a 6’-wide window to a 7’ window may require a lintel (header) to be altered from a three-ply 2x6 to a three ply 2x8 to handle snow loads. If that isn’t communicated to us, the end result will be a complete tear-out of the window assembly to install the correct lintel.
Another example: replacing a deck or exterior stairs serving a second storey duplex or apartment suite. There is an array of fire-safety regulations at play in such cases, and something as innocuous as moving a set of stairs two feet closer to a building wall can create problems that will require expensive alterations after the fact.
One area that has also been problematic involves renovations: very often, “replacing a living room window with a similar-size window” turns into “that whole wall is rotting, and we have to rebuild a load-bearing wall.” If the scope of work changes, call one of our inspectors.
Hey folks – the SNBSC building inspection department, in conjunction with Nudura and Bird Stairs, is pleased to announce a special education event for Monday July 11.
The topic will be the construction of shear walls under the Insulated Concrete Form Manufacturer’s Association (ICFMA) engineered design guide. The guide shows how to construct shear walls (above-ground ICF in seismic areas such as ours) and how to create openings in ICF walls closer than 1.2 m from corners.The session will cover not only Nudura, but QuadLock, SuperForm, Logix, BuildBlock and Fox Blocks systems.
Session will run from 9 am to 2 p.m., at the Hemlock Knoll Landfill. Lunch is provided.
Please pre-register by emailing john.cliff@snbsc.ca. Space is limited, so it’s advised to register early.
Our office is seeing a significant spike in building permit applications at this time. While we are still trying to keep to a two-week timeline from application to issuance of a permit, a staggering number of permit applications are suffering needless delays because applicants are not providing enough information for our staff to conduct reviews.
In order for us to process an application, our administrative staff will require
Septic approval or re-approval documents for new home/business construction, or bedroom additions
Wetlands approval for properties near a designated watercourse or wetland
An accurate site map showing distances from the proposed building to all adjacent properties and buildings
Setback certificate for new builds that require driveways
Civic number for new builds on newly created/yet developed lots.
Our building inspectors are also seeing a disturbing number of applications with incomplete building plans. As stated, we require a scale drawing of the proposed construction, showing how all walls, floors and roofing systems will be constructed. This includes a detail on where required earthquake bracing panels will be located. If you have hired a professional designer, it is up to that designer to know the Code and prepare Code-compliant plans, including required earthquake bracing: our inspectors are not allowed to provide design guidance by law.
At this moment, there are 12 applications awaiting review by a building inspector, and of those 10 are on hold because the plans did not have sufficient detail. Some of the issues that can cause a plan to stall:
Plans that do not show a required footing. Remember: an engineered design is required for almost all load-bearing slab-on-grade construction, contrary to popular myth.
Plans that do not show scale.
Plans that do not show required earthquake bracing.
Plans that are simply, clearly, and obviously not Code-compliant (such as an attached deck supported on deck blocks, using 4x4 posts as supports).
Sketches of a building with no detail on how walls, foundations, roofing or any other elements will be constructed.
Help us process your application quickly by making sure all the information is included. If in doubt, call an inspector before you file your application - it may save you lost time down the road.
Ah, it’s spring – that when the snow vanishes and DIY deck builders start using screws where they shouldn’t.
We’re not worried about the snow going away, but darn, we do get a bit cranky about the whole “don’t use screws to build things” part of the equation.
So, here’s a reminder: screws are NOT to be used for any structural connections. Yes, we’ve said it before, but as those who read our “top 10 infractions of 2021” list recall, the fact that people keep doing it is reason for us to say it again: do not use screws for structural connections. It will make us sad, but not as sad as you will be when we tell you to do your work over again.
Screws in post connectors, joist hangers and hurricane ties are not permitted by any manufacturer that we are aware of.
And, lest our message not be clear enough, “structural connections” also means joist hangars and post brackets.
Simply put, these kinds of metal connectors have been designed by engineers to provide structural connectivity, and the engineers require very specific connections – usually either nails or engineer-approved screws.
Extensive research by our building inspectors has yet to find a single manufacturer of joist hangers, post anchors, post connectors and hurricane ties that accepts wood screws as a connector. Not one. Zero. Nada. Zilch.
In other words, the picture you see here represents a big no-no. And it makes us sad.
Our inspectors had an interesting discussion the last little while over an issue that apparently is common.
An area contractor asked if OSB sheathing could be installed vertically (in a braced wall panel) instead of horizontally.
The question led to an interesting dive through the Code books, standards, manufacturing requirements and the like.
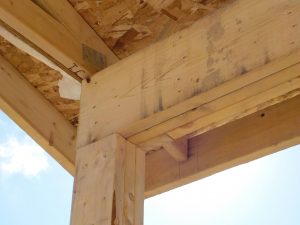
First off, there are requirements in Code that OSB and similar sheathing materials is installed perpendicular to joists or roofing systems (rafters/trusses), and frankly, this is almost never an issue as far as framing inspections go. Most contractors install OSB wall sheathing horizontally, presuming the same factors are in play as for roofs and floors. However, after much digging, it turns out that there are no requirements to do so. That said, OSB has greater strength on its long axis, and best practice says to install it horizontally.
So, while we’re on the issue, here’s a quick thought: if you’re installing OSB or plywood as sheathing material, do you leave a gap? You’re required to – 2 mm by Code, in fact. [9.23.17.5(1), 9.23.16.4(2)]
Our office has issued its first development placard of the year.
Your proposed building may not need a building permit, but may need a formal approval: a development placard.
This little guy will grow up wanting to be just like its big brother the Building Permit, but unfortunately will only be good for accessory structures because of its size.
This momentous occasion may raise a question – what the heck is a development placard?
To answer that question, we have to get a bit legalese: while the province’s default building regulation exempts a certain class of buildings (accessory structures, and residential dwellings less than 604 square feet – aka “camps”) from a building permit, there are still a host of requirements that a development has to hurdle. In some rural areas, there are development restrictions, either due to proximity of major highways, or the presence of a rural zoning plan.
There’s where a “development placard” comes into play: it’s usually a formal permission to build a Code-exempt structure.
As always, the lesson here is simple: contact our office to determine what permits (if any) are required.
The ultimate job of every builder is to do things right – at least, that’s what we’d hope. Our job is to make sure that things are, indeed, done right. But as those who read our Facebook page or regular “inspectors notebook” posts on our website have probably figured out by now, there are some issues that our inspectors keep finding on jobsites around the region. These are the most common Code infractions of 2021:
#10: Missing or improperly installed carbon monoxide alarms
This issue used to be a vastly more common concern, but thankfully, more and more contractors and electricians are catching this glitch. Simply put, if a home has a gas appliance, wood stove, or attached garage, carbon monoxide alarms must be installed in or within 5m of every bedroom.
#9: Improper egress windows
When fully open, this bedroom window only gave a bit more than 12" of clearance. 15" (38 cm) is required.
Of all the items on our list, this one was a shock to us. It’s long been known that a sufficiently large window must be installed in every bedroom. The idea is that when people are home, they spend most of the time in bedrooms, meaning that’s where they are likely to be if a fire occurs. An egress window (which must be 545 square inches, with no dimension less than 15” when fully open) is required in every bedroom to facilitate both escape from and entry (by firefighters) into the bedroom. The fact that we had egress violations at all is a major concern, in part because it’s an expensive process to remove a too-small window and replace it with a larger one.
#8: Emergency lights not installed
While residential construction represents a vast proportion of our annual building permit construction, this violation is driven by commercial building inspections. Code requires that the pathway to all exit doors in non-residential buildings must be provided with emergency lights that will turn on if the power goes out. Commercial builds represent about 16 per cent of our permits issued in 2021, but this oversight occurred often enough that it landed on a top 10 list largely dominated by residential construction violations.
#7: Improper closing/sealing of door to garage
The common way to ensure a door to an attached garage closes is to use these spring-loaded hinges. A hex (Allen key) wrench can be used to add force to the springs to ensure the door closes.
Code requires that doors between garages and a home have tightly-fitting seals (in other words, exterior doors) that are fitted with a self-closing device. We weren’t surprised to see this slip into our top-10 list of common infractions: One of the reasons this infraction hits the list is that when our inspectors arrive for a final inspection on a new home, we often discover that the spring-loaded hinges have not been installed because contractors don't want a door closing behind them when they are moving materials into the house from the garage. In many cases, the hinges haven't been adjusted properly, and can be remedied before our inspectors leave.
#6: No foundation for attached decks
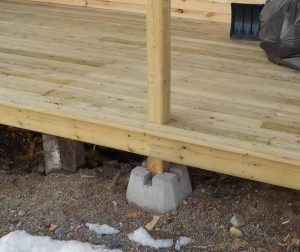
These so-called "deck blocks" should not, in fact, be used for any deck attached to a house.
If our inspectors could wave a magic wand and make changes for the greater good, one of the things we’d do (well, after wishing for world peace, maybe) is require those ubiquitous pre-cast concrete blocks to be called something other than deck blocks. If you’re building a small free-standing platform that's a foot off the ground, we won’t mind you use the things – but if they're used support a deck or some other structure attached to a building, expect our inspectors to cite clauses 9.12.2 (1)(7), 9.12.2.2 (1) and 9.23.6.2 of the National Building Code, along with a requirement to start over ($$). Simply put, these concrete blocks must NOT be used for attached decks. Decks or platforms attached to a building must be anchored to a foundation system of some sort (screw piles or sonotubes either resting on a suitable footing area, or on solid rock) to avoid the catastrophic structural damage that can be caused by frost heaves.
#5: Fence posts used for deck construction
We cannot stress this enough: any platform (deck) attached to a building must have support to a footing 4' below grade. These concrete blocks are NOT Code-compliant for attached decks.
This used to be a far more common issue, but thankfully a combination of education, enforcement and pro-active plans reviews by our inspectors has helped curb the use of 4x4 posts (most often found in deck construction.) Unfortunately, some people still haven’t got the message: when building decks, porches, verandas and the like, Canadian Codes require that 6x6 columns be used. A 4x4 post is ok for a fence, not for a deck: don’t use them.
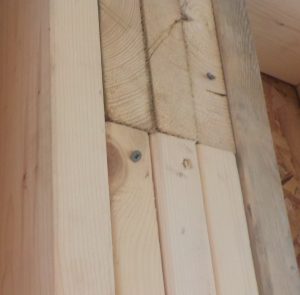
#4: Improperly constructed beams
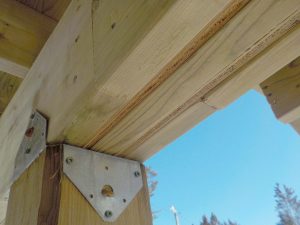
If you’re building a beam, the best thing to do is splice it over a post or support. If you’re going to splice it somewhere mid-span, you have to do so within ¼ the distance between the supports, and only near interior supports. There are some other requirements (as outlined here). The number of improperly spliced beams is driven significantly by DIY builders making errors when framing attached decks.
There are two splices in the same quarter of this three-ply beam, which isn't acceptable. Further, alert eyes will notice that the brackets have been screwed in using one engineered screw and a handful of wood screws, which is also an issue.This beam has a splice, but it's near an outside support. This, also, is not permitted.This beam is fails to meet Code on two fronts. One, there are two splices in the same quarter of a three-ply beam. Secondly, one of the splices does not have a full-length member running to the adjacent post. A rebuild was ordered.
#3: Insufficient nails between trusses/rafters and top plates
We were somewhat surprised this fell into No. 3 on our list, because it’s been a point of enforcement for years. The basic rule of truss installation is that each truss has to be nailed with three nails of at least 3 ¼” length. (In Monty Python-esque terms, three are the number of nails there must be. Two nails are not permitted, and one nail is right out. Unlike Monty Python, four nails are perfectly fine, and hurricane ties - suitably nailed of course - are just peachy.) One of the misconceptions we’ve encountered is that if exterior sheathing laps from an exterior wall onto the drop chord element of a drop chord or raised heel truss, that it’s OK to reduce the number of nails between the truss and the top plate: not so. Some of these occurrences were nothing more than an oversight, where someone forgot to hammer in a third nail on one truss connection of dozens, but sadly, the majority of infractions were simply contractors or homeowners doing things wrong from the get-go.
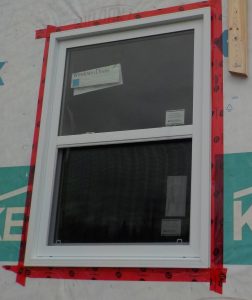
#2: Improper window installation
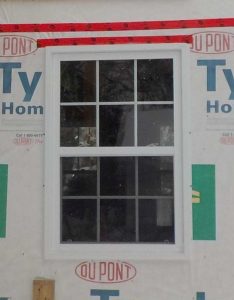
Despite the fact that it’s a point of enforcement for years, our inspectors continue to find incorrectly installed windows: either flashing pans are not installed or installed incorrectly, or the windows are improperly flashed/sealed. This is of considerable concern: The No. 1 cause for claims under the Atlantic Home Warranty program is due to leaks in, on, around and under improperly installed windows. Correct window installation isn’t complicated or expensive, but incorrect installation can lead to incredibly costly repairs. If you have any doubts about how to install a window correctly, see our info guide here, or download a .pdf flashing outline. We cannot state this forcefully enough: if we find an improperly installed window, we will require corrections – and if this means removing a window when siding has already been installed, so be it (and yes, we’ve ordered this: it doesn’t make us a lot of friends, but it saves homeowners the headache of expensive repairs.) Here's a simple rule to at least guide installers in the right direction: Do. Not. Use. Sheathing. Tape.
This window had silicone sealant on the sides, but lacked a flashing pan and suitable flashing at the top. It had to be re-installed.Sheathing tape is NOT an acceptable material for preventing water from entering a window. Moreover, the tape at the bottom prevents drainage from moisture that may accumulate under the window (from, for example, condensation.) This window had to be removed, and installed properly.There is no flashing pan at the bottom of this window. Fortunately, the installation was in its early stages, and re-installation was not too onerous.
(dis)honourable mentions:
Improper/missing balusters in a guard: Oh, those horizontal wire ship-look guards are sharp looking things, aren’t they? This design was allowed in 2021 due to the introduction of NBC 2015, which relaxed rules in the 2010 Code. The problem: these horizontal-wire guards must still prevent the passage of a 10 cm sphere, and in almost every case we saw in 2021, the wires could be easily moved vertically to spacing often double the 10 cm limit. For this reason, we strongly (strongly) recommend not using these systems, unless the wires are strung at spacings closer than is common, to avoid these sorts of issues.
Improperly nailed lintels: Lintels (headers) must be nailed with two nails at distances no greater than 18”. Filler pieces are allowed at spacing no greater than 18”. We found an interesting trend in 2021, where contractors were spacing two-ply lintel elements to the outside edges of 2x6 construction, with foam or fibreglass stuffed in the gap – but no material connecting the two lintels. This will be a point of enforcement for 2021.
Insufficient attic insulation: We found a number of situations where contractors or homeowners had not placed the required R50 of insulation in an attic. We’re not sure why: this has been a longstanding requirement.
And now, the most common infraction of 2021:
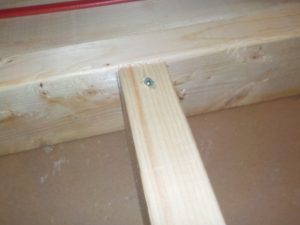
#1 Wood screws used instead of nails
This joist hanger is improperly installed. First off, the installer used wood screws instead of nails, and secondly, not all the anchor points have fasteners. The installer was ordered to remove the screws and use nails throughout.
For some reason, a lot of people – and that includes DIY builders and contractors alike – will assemble structural elements with ordinary Robertson-head deck screws. Simply put, this is not permitted (here’s why). All structural, load-bearing connections must be either nailed or attached with specialized engineered screws. (Engineered screws are usually quite expensive, and feature either a hex head or a Torx head.) Wood screws (also known as deck screws) are not permitted to be used in hurricane ties or for joist hangers, either: it’s such a common error that if taken alone, improperly installed hurricane clips and joist hangers would have ranked as the No. 3 on this list. Sadly, despite consistent education and enforcement, we continue to find abundant examples of screws used instead of nails. As one of our inspectors says regarding the Code's table on how to achieve compliant structural connections, "It's called a nailing table for a reason."
This three-ply beam, intended to support a fairly large deck, was held in place with four wood screws.Studs must be attached to top plates with two 3.25" nails. (Not one exterior-grade deck screw.)
To summarize, screws tend make our inspectors unhappy. Nobody likes unhappy inspectors: use nails.
Hey, we get it. Between Christmas and Covid and "egad, we need winter tires" and all the other stuff going on in our lives, it's easy to forget little details like the fact provincial regulations will phase out the 2010 edition of the National Building Code effective Dec. 31.
But we just wanted to post a little reminder that any applications received by our office after midnight Dec. 31 will have to follow NBC 2015. We did all this back in February of last year (until the province changed the rules to allow 2010 to be used until the end of the year.)
The critical thing for our office will be to ensure plans for buildings in the St. Stephen/Saint Andrews area meet NBC 2015 earthquake standards. For more, see the link here, although there are some other things to take into account - see the link here.
Need a hand? Give our inspectors a call. We'll do our best to answer your questions.
We're getting to that time of the year, aren't we?
As much as we hate to admit it, it's pretty much winter. The forecast is showing below-zero temperatures, and that puts a damper on construction - especially pouring concrete.
That's because concrete has to be kept above freezing - and a bit more - to be effective.
For this reason, our office will require anyone pouring concrete from now until the spring to file a "warming plan" with us. That's just an outline of how any concrete set at this time of the year will be kept at suitable temperatures, or otherwise treated so that it achieves its required design strength before the assembly's net temperature drops to freezing temperatures.
Depending on the weather, this may mean nothing more than covering concrete with tarps, or it may involve creating an entire "tent" around the construction and keeping it warm with blast heaters.
For more, check out our knowledge base article on cold-temperature concrete here: https://snbsc-planning.com/cct/cold-temperatures-cement/