We could bore you with all the jargon in the Code book, but the basic take-away is this: beams must be supported by resting atop a load-bearing element.
Southwest New Brunswick Service Commission
Planning Division – Inspections, Development, and Community Planning
Tips, insights and suggestions from our building inspectors …

We could bore you with all the jargon in the Code book, but the basic take-away is this: beams must be supported by resting atop a load-bearing element.
For the most part, those of us living in New Brunswick escaped the wrath of Hurricane Dorian – but as images and video from Nova Scotia show, the power of a hurricane is immense.
And New Brunswick will be hit: it’s not a matter of “if,” but a matter of “when” a hurricane will hit us. The lesson? Prepare now.
Hurricanes cause damage in two key ways: high winds and flooding/storm surges.
Here’s what our inspectors suggest as things to do in forthcoming renovations or new builds to better weather a hurricane.
1) Use hurricane ties to secure rafters/trusses to roof plates. This is easy to do in a new build, not so easy to do in a renovation setting.

2) Specify heel or drop-chord trusses in new builds. This allows for exterior sheathing to help tie rafters to the rest of the building
3) Over-use eaves protection membrane. In many cases, the combination of high winds and intense rainfall causes water to be wind-driven in places it normally doesn’t go. Alternately, roofs are exposed to rain after the winds remove shingles. Flashing roof joints with ice and water shield membrane, even when not called for by Code, can help reduce water damage.
4) Avoid gable roofs. Though popular, gable roofs present a face to wind that other roofing systems (hip style, in particular) do not.
5) Plan for strong wind and rain by pre-building a blocking system for roofs vented using an end-gable vent.
6) When using soffit-and-peak venting, only provide as much soffit venting as required by Code, to reduce wind intrusion into attics
7) Over-nail roof sheathing to truss/rafter members. Codes for U.S. areas subjected to high wind mandate nailing every six inches on all truss members, not just at sheathing joints.
8) Avoid staples for fastening asphalt shingles. Areas of the U.S. exposed to hurricanes mandate roofing nails, because they perform better in high-wind situations.
9) Build so that valuable portions of a home will be above flood levels.
10) For homes in areas subject to flooding, raise them using concrete walls that have “vents” at the sides to allow for easy infiltration and outflow of flood waters.

11) Install a backflow prevention valve.

12) Place outbuildings on concrete slabs or other footings.
These tips are taken from our “preparing for climate change” pamphlet, or a more comprehensive “preparing for climate change – a guide for builders” available for free at our offices.

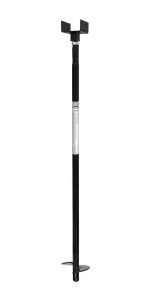
We have run into a few issues of late with homeowners and contractors using an over-the-counter screw pile available over-the-counter from hardware stores. While advertised as a foundation screw for decks, these piles are NOT acceptable for attached decks. For one, they only allow for the attachment of a 3.5-inch post which is not Code-compliant for bearing any kind of deck load. Secondly they have not been approved as Code-compliant by the National Research Council of Canada, which oversees testing of construction products.
Please ensure that if you are using helical piles that they are the kind compliant for attached decks, and have met the engineering tests required to ensure they meet Code. Yes, they may cost more, but there is a wealth of testing to make sure they will do what they say they can do.
As always, please contact our planning and inspections department (and apply for/receive a permit) before beginning construction: you don’t want to rebuild an improperly-constructed deck, and we don’t want that to happen either.
We serve the unincorporated rural regions of Charlotte and southern York counties as well as the municipalities of Saint Andrews, St. George, McAdam and Harvey. If you live in any of those areas,
call us (466-7369) to make sure you have all required permits. That way, our team of professionally trained and certified building inspectors can ensure your plans meet or exceed the requirements of the National Building Code of Canada (2010 edition) which in turn will give you the confidence that your project will be done right the first time.

They’re usually hidden, done quickly in those early and heady days of new construction, but the footings upon which your new home rests are among the most critical of building elements.
Footings need to be set on undisturbed soil, or – as needs be – on compacted, clean, well-draining fill. They also need to be below the depth of frost, which is 1.2 metres or 4’, in general. Those who have rocky building sites may be able to set frost walls directly onto rock – call our inspectors to make sure, however.
A basic one-storey wood-frame home demands a minimum footing width of 25 cm, or just about 10 inches. That’s pretty scant, and most builders will go well beyond that, which we don’t mind: remember, Code is the bare minimum acceptable, and nothing stops a builder from going above and beyond.
We didn’t see large footings required for residential builds, because the above width was good for spans of up to 16 feet (4.9 metres). However, with the growing popularity of engineered trusses, we’ve started seeing homes with open joist spans of 25, 30, even 35 feet: the greater the joist span, the wider the footing must be.
For example, a one-storey stick home with a 25-foot joist span will require a 15 1/2” footing. A 30-foot span would need 18 1/2” footings.
Add another storey on to a build, and the demands on footings increase: a 25-foot joist span on a two-storey home will demand a footing of just more than 21 inches.
ICF (insulated concrete form) houses also require heavier footings, as does brick fascia.
Confused? Don’t be. Our inspectors are trained to calculate these numbers for you as part of the plans review we do on each new home build or addition sent our way. It’s one of the many reasons why (apart from the fact it’s the law) that you need to obtain a permit.
“I didn’t know I needed a permit: I don’t live in town.”
Our development officers and building inspectors hear this line a lot, even though permits have been required throughout the province since 2002.
Here’s the 411 on permits in our area.
First off, our team of planners have worked with the towns of St. George and Saint Andrews, as well as the villages of Harvey and McAdam to streamline building bylaws. Residents of those communities can now build small buildings of 600 square feet area or less, including garages, with a development permit.
This matches a long-standing policy for the unincorporated areas. In fact, outside of a municipality, accessory buildings can be quite large, and yet still only require a $50 development permit.
If a permit is required, we’ll make sure that a structure is located in a suitable place, far enough from any neighbours, roads, or designated wetlands. (And if wetlands are involved, we’ll make sure you have the right provincial permits to build, and help you through the process.)
The development permit structure for unincorporated areas also allow construction of small camps (residential buildings) of 625 square feet or less.
Bottom line? Call us and ask.
This week’s post is an interesting tip about levels. Did you know that not all levels are, in fact, level? In more than a few cases, the glass (plastic) arcs that hold the bubble are, in many cases, microscopically twisted.
Before buying a level, here’s how to verify that it’s accurate.

Put the level on a horizontal surface, and bring it to where the bubble reads “level” by adding objects at one end (like business cards, coins, etc.)
Then rotate the level so that the end that was on your right is now on your left. If the level is accurate, the bubble should be in the same position.
If it isn’t, then the bubble is wrong, and the level isn’t level.
In the image shown here, this is the bubble after the level has been swapped left-to-right. It no longer shows level! This means this "level" is going back to the hardware store.

When you find one that is, repeat the process for the vertical axis – put the level on a vertical (wall) and pad it out with something at the bottom until it reads level, then flip the top and the bottom. If it reads the same both ways, the level is also accurate on the vertical bubble as well.
Sometimes, a plain and simple question has a not-so-plain-and-simple answer. Take guards around a deck, for example, or a handrail on stairs. What height do they have to be?
Answer: it depends.
Let’s start at the basics. A guard is a horizontal object – usually wood, sometimes steel – that is intended to prevent someone from falling from a height when there’s an open space. So you’ll see guards around decks, or on stairs when one or both sides are open.
In general, guards are required when there is a height difference of 60 cm or more. In a home, exterior and interior guards have to be 90 cm in height, minimum. That’s 35.4 inches, although most contractors will build to 36 inches, or three feet.

However, there are some situations where greater guard heights are required. For example, a guard on an exterior platform (deck) has to be 107 cm high (42 inches) if the height to finished grade is 1.8 metres or more.
Guards must be 107 cm high in all non-residential situations, both interior and exterior.
Now, what about handrails? These serve a different function: they’re for grasping as one goes up and down stairs. Height of handrails should be 86.5 to 96.5 cm (34-38 inches) high, except where guards are required. In that case, they can also range up to 107 cm in height. What that means, in simple language, is that in most cases, handrails are incorporated into the guard.
In general, guards should be closed with either balusters separated by gaps no more 10 cm gaps, or tempered glass.
Questions? Give us a call at 466-7369.
Recently, a client asked one of our inspectors a question that’s we've heard a few times: “Why are you measuring this window?”
During a final inspection, it’s typical for our inspectors to enter every bedroom, and check the sizes of the windows, as well as verify that smoke alarms have been installed. It’s pretty obvious why a building inspector would check the smoke alarm, but the window? Not so much.
Section 9.9.10.1 of the National Building Code mandates that every bedroom requires either an exterior door (that is, a door that leads into the great blue yonder) or a window of sufficient size that someone can get out of the window in an emergency.
The window needs to have at least 0.35m² in area (that’s 3.77 square feet), with no space when opened that is less than 38 cm (15 inches) wide.

In building terms, this is called an “egress window.” If you’re doing some home renovations, always be sure to specify an egress window for every bedroom, to make sure the window meets Code requirements.
If there’s a patio door from the bedroom, there is no need for an egress window, but a door that goes to some other part of the house is not sufficient. Egress window regulations also apply to all residential suites (i.e. apartments.)
“OK,” said the client, after hearing a point-form version of the explanation. “But there’s no way I’m jumping out of that window – it’s, like, 30 feet up.” The quick answer to that is that the height of the window is not a consideration: firefighters have ladders. Egress windows are there to give firefighters an easier time of hauling you out of your bedroom if you and your home are having a bad day.
Egress windows are a key part of the life-safety functions of the code, and our inspectors will check to make sure egress windows are part of plans for every home and suite of residential occupancy.
Our planning and inspection department serves St. George, Saint Andrews, Harvey, McAdam and all unincorporated areas between Lepreau and the Hanwell Road north of Harvey. Questions? Give us a call at 466-7369.
This is a busy time for people wanting to build, and we want to make sure you can get shovels in the ground as soon as possible. The simplest way to make that happen is to call our Planning Department early in the planning process, because we can identify potential challenges such as:
(It should be noted that many of these potential obstacles are bylaws set by municipal governments, provincial regulations, or building code regulations, not the Service Commission.)
We tell our clients it takes three-five business days to process a permit, but if all the preparation has been done, that will make turnaround much easier. The last thing we want is to receive a permit application and only then identify a potential obstacle.
Our professional staff are trained to help you navigate a path through provincial and local regulations and get you to your building goal. The best way to help us do that is to call us first, not last. Our number is 466-7369.
Sometimes, you just have to say the same thing over and over. And we're going to do it again. (As one of our building inspectors says, "I love, admire and respect redundancy.")
Last week, we discovered a brand new deck built with (alas) 4x4 posts... now, any readers of these writings can probably guess what happened next.
The builder was instructed to remove those posts, and replace them with 5 1/2 square (known as 6x6) posts. This isn’t something we like to do at all. In fact, we dread having to tell someone they just built something that doesn’t meet Code, which is why we have posts like this on our website and social media feeds.

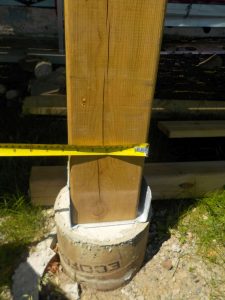
Here’s the super-simple summary: decks attached to a building require nominal 6x6 posts supported by foundations (sonotubes, helical screw piles, frost wall).
Where can you use 4x4 posts on something attached to a building? For carports (not awnings over a deck) and fire escapes (not exit stairs! Questions? Call our office). That’s it.
The other worry we have: deck blocks. Please, please, do not use deck blocks for any structure attached to a deck: this leads to risk of structural weakness due to frost heaves. The only place you can use these is on small accessory structures (and this includes things like a small set of stairs NOT attached to a building.)
Since the Codes are now available online, we’ll cite the section of Code regarding posts, which are technically called columns:
9.17.4.1. Column Sizes
1) The width or diameter of a wood column shall be not less than the width of the supported member.
2) Except as provided in Article 9.35.4.2., columns shall be not less than 184 mm for round columns and 140 mm by 140 mm (that’s 5 1/2 inches) for rectangular columns, unless calculations are provided to show that lesser sizes are adequate.
BTW: “unless calculations are provided” means “show us an engineer’s approval that this is good enough.” Without going into details, let’s just say that obtaining an engineer’s approval will cost a whole lot more than just using the right-size post the first time.